Showing posts with label Trailer Mod. Show all posts

Wednesday, August 13, 2014

Trailer Mod - Upgraded Bunk Fan

The bunk fan/light combo that come with the Hybrid Trailers are, in my opinion, very inadequate.  I think they make more noise than they move air.  So, I have been looking for a fan that I could use that would help keep me cool inside my bunk.  I was considering the Fan-Tastic Endless Breeze, which is a very good fan, but a little pricey at around $60.  Then, walking around Target, I found the 02 Cool Fan for $22.  This was about the right size, but, how about performance.

So, I bought it, took it home, and plugged it into the wall using the power brick that came with it.  It has 2 speed, one less than the Fan-tastic, and it worked real well.  It was a lot quieter than those little bunk fans, and moved a lot more air.  Now, came the dilemma of how to mount it.  So I took it apart and found a lot of open areas that I could work with.  So, here is what I did.


I bought some threaded eye hooks at Home Depot, some extra nuts, and some regular and fender washers (to spread the weight on the plastic, probably overkill), and some light duty decorative chain.  I was going to attach permanent eye hooks to the camper, but Jen said to try and use the 3M stick on hooks, due to the fact that we want to upgrade and not depreciate the trailer with extra holes (she is my brain sometimes).

The next thing, how to power it.  This fan operates on 12VDC via a power brick, or, by 6 D cell batteries.  In my tests, the 6D cells, providing 9 volts, didn't perform as well as the 12VDC.  So, I went to Radio Shack, Bought the correct adapter tip, female to female 6 foot cord (which I cut in half), and Solderless 1/4" Audio Plug.


This setup seems to work great.  With the chain, I can adjust the angle of the fan.  The 12 volts means that it can run at any time.  The one thing that I want to get, next time I order from Amazon, is a 1/4 splitter.  That way, I can still use the stock bunk light, and use this fan, at the same time.

Thursday, April 17, 2014

Trailer Mod - Battery Disconnect Switch

Sorry for the long absence.  The railroad has me working hard.  I have been doing little things to the camper to get it ready, but took a few trips off to go camping this weekend.

Today's mod, we put in a battery disconnect switch.  My Roo did not come with one from the factory, although, I believe new models are coming with one.

The main reason for the disconnect is so that you can store your trailer without hooking up the power.  What happens, there are little parasitic draws on the battery, and if you don't disconnect or plug in, you are going to kill the battery.  Drawing the battery too far too many times is a good way to shorten its life.

Some of the parasitic draw are:
  • Refrigerator Electronics (never had this issue in the 90s)
  • Safety Devices (Propane alarm, and any other 12v detectors)
  • Clock Radio
  • Television
On the forums, some people said to break the ground, so that if you accidentally ground the terminals on the switch, no harm.  The problem I see with that is the trailer breakaway is now disabled if you forget to turn the switch on.  So, I decided to break the positive just before my converter charger and put the switch there.

I bought a single battery switch from Blue Sea Systems, model #6005.  I liked this because there were 3 mounting options, a removable "key" to turn it on and to remove when off, and it was quite small. I chose mounting it by sandwiching the paneling between the front and back, and using the thicker wood on the sides to help brace it.  I also had to shave some of the edge off my propane alarm due to the tight fit.  One mistake I did, the hole saw grabbed and marked the wood.  I will have to get some of that furniture fix stuff to get rid of the mark.

Besides the switch, other supplies I needed were:
  • 4 #10 by 2 1/2 screws and nuts (Ace Hardware)
  • 6 foot piece of 8AWG battery wire (Autozone)
  • 3/8" 8AWG terminals (Autozone)
  • Holesaw (Ace Hardware)

Battery Disconnect mounted and in the ON position.

Proximity to my Converter.  Only needed on short piece of 8 gauge wire to do the job.

Saturday, May 25, 2013

Trailer Mod - MaxxAir II Roof Vent Cover

One thing that I wanted for my trailer was roof vent covers.  First one to be put on was the one for the bathroom.  Since this one already had a high powered fan, I decided to put on a MaxxAir II cover.  Installation was simple, and was complete in less than one hour.  Any handy RV person, who is not afraid to get on his/her roof (yes, I am afraid, but grew a set and got on there) should be able to complete this project.

I was hoping that this was going to be more simple than it was, since the previous owner had roof vent covers and had removed them.  WRONG.  Difference brand/style of covers, and the holes didn't line up.  So, I had to make my own holes.

 First, attach the hinged side.  I took my time, making sure everything was correct.

 After 2 screws, I took the cover off to get to the other 2 screws.  The instructions said to use the self tapping screws for installation in a Fan-Tastic fan installation.

 I then put the cover on, and mark where the brackets lined up for the clip side.I then drilled and installed the 4 self tapping screws.

Finished Product.

My other roof vent will get a MaxxAir TurboMaxx fan.  That, is a bit more expensive, and a bit more work.  I hope to have that installed by the end of summer.

Friday, May 10, 2013

Trailer Mod - Range Hood Exhaust Vent

Last weekend, I washed and waxed the Roo.  While washing it, I noticed that the flapper for the range exhaust vent was missing.  Come to find out, the Heng exhaust vents are known for it, and they sell replacement flappers.  I was happy that it was going to be a sub $10 fix until I cut and cracked the housing while trying to cut and pry the caulking.  So, it turned into a $20 fix..plus cost of the mod.  Luckily, these were in stock at my Friendly RV Supply, Rousseau's RV.

I saw on the Forum that someone used mini hinges to fix theirs.  Well, I took that person's idea.  I cut up a brand new Hengs Range Vent and modded it to last.

While shopping for the hinges, I had to pick up a rivet gun, since I didn't have one.  A good rivet gun is a must for RVing.  There is so much that can be riveted in an RV.  But, my local Ace, Schwartz Hardware, had everything I need.  Actually, I prefer them 99% of the time over the Big Box Stores.

Here are some pics and explanations of what I did.  Sorry about the poor quality, as all my cameras were being borrowed, and I had to use my DROID Bionic.

 Here is the Flapper for the Heng's Vent.  Those 2 little hinge tabs are very weak.

 This is the flapper after I did some cutting.  I had to make notches for the new hinges. 

 Flapper installed onto the main part of the assembly.

Here is the back side of the assembly. 

Installation onto the camper was not too hard.  Butyl tape and Proflex RV Sealant Caulking is all it takes.  I still am not that good at shaping the Caulking.  But, I am getting better at it.  The finished product works great!!

Wednesday, April 10, 2013

Trailer Mod - LED Awning Lights

A popular mod going around is the installation of LED Light Strip under the awning.  These relatively inexpensive item gives the camper a nice glow to it.

On the forums, pretty much everyone I see installing these had an electric awning.  I have a good old fashion manual awning.  They had a nice hole to run a wire through, I didn't.  I had to make my own hole, and that was the most nerve racking part of this mod.  If you can avoid making holes, that is the best way to go.

The dreaded hole in the camper.  I hope I know what I am doing...

The bushing.  I felt that this was the way to go.

I decided to cut the connectors off, since I was not going to drill a hole big enough for the connectors.  And they wouldn't go through the bushings either.

.Little help from my father, all wires soldered and each individual wire was heat shrinked, then the hole cord was heat shrinked. One nice thing about the Dometic LEDs is that the controller has terminal screws.  I wish this one did.

Don't forget to clean the surface for better sticking.

I was able to use nearly all of the LEDs.

A little test.

One more Test.
 .

A little silicone.  Goes on white, dries clear in 1 to 2 weeks...as what the package says.

 
I still don't have the finger smoothing down yet.  Hope that when it dries clear, it looks a little better.

I also put some silicone on the ends of the strip, as recommended by someone on one of the forums.

Tuesday, April 9, 2013

Trailer Mod - Bathroom Light Fan Switch

One thing a seasoned RVer knows, always shut the fan off before you flush.  There is a good chance that you will suck the beautiful smell out of you black tank and into the living area.  Well, with a 7 year old, who is the shortest in her class, that could be an issue.  Especially when the light and fan are on the same switch. 

So, I decided to take the switch apart and take the trim ring down off the fan and see how this is wired.  I was in luck.  the feed went to the fan, then down to the switch, back to the fan, then to the light.  Jiggled a few wires back and forth, and the wires move freely.  Great.  This former alarm tech should have no issues fishing a new wire so I can put the fan on a dedicated switch.

So, I went down to my friendly RV dealer and parts supplier, Rousseau's RV.  I picked up a double switch, which looked black with sunglasses on, but was actually brown.  Close enough.  Here is what I did to get everything all together.

Single Switch to control Lights and Fan.  Can you say penny pinching.

Pulled the trim ring down, and found out the feed (near the knob) came through the ceiling, then back into the wall, to the switch.  Then it came back out and to the splices.

So, I tied a good size #14 primary to the wires.  #14 should handle the 4 amp motor, being capable of handling 15 amps.

Pulled the wire through...  Retied it a few feet further down...

Then I pulled the factory wires back to the switch location.

Made my connections.  The dark blue was factory.  The light blues and yellow are mine.  I always use quality shrink wrap connectors with a 1000 watt heat gun to shrink them.  I feel they look a lot better.

Remade the splices, once again, shrink butt connectors.

Here is the new switch.  Not exactly the same, but this camper only has 2 switches.  This one, and one for the outside porch light.

One more look at the final product.

Monday, April 8, 2013

Trailer Mod - 5lb Propane Tank

I hate those little 1 pound green "disposable" propane containers.  Yes, I know, with some effort, they can be refilled.  But, they are still a pain in the rear.  So, many years ago, I have gotten myself a nice 5lb propane bottle.  It is used everywhere I bring my grill or stove.

My issue, where do I keep it.  I really don't want a 5lb bomb rolling around inside a match stick box.  I look at my tongue, and there it was.  The unused portion of my battery box.

Now, I am not a boondocker...as of yet.  And, if I do boondock, it will probably be for just a night at the beach.  A single battery should do fine, so there is no need at this time for more than one battery.

So here it is.  A simple mod, using aluminum angle, aluminum flat, and 2 rubber bungee cords.


Now, if one of the regulator companies would take my suggestion, then maybe I can do away with this 5 pounder.

Saturday, April 6, 2013

Trailer Mod - 12V Insignia TV

Before bringing the camper home, I saw that Best Buy had a sale on a 17" or 19" Insignia TV for just under $100.  The nice thing about this TV is that it operates on 12VDC.  So, knowing that I can just hook it up to the 12 volt system in the RV and not have to worry about 120V power supplies and being able to watch TV without power, I purchased it.

The previous owner already had this piece of wood attached securely in the corner where the TV goes, and it appeared he once had a TV there.  I bought a swinging mount, and attached it there.  I went to radio shack, and bought a wire and the appropriate end that fits the television.  I spliced it into the wire going to the antenna booster.  This is where I needed help from the people at Forest River Forums.

I had no idea how the antenna booster works.  I found out that it is also a switch.  When the antenna booster is on, the signal for the TV comes from the antenna.  When it is off, it comes from the park cable.  Great, I just had to run one coax to the TV.

Now for audio, I ran a 3.5mm connector, similar to headphones, and ran that to the input 2 on my Concertone ZX75 audio system.  I get better sound from the built in speakers in the camper.  I also ran a video wire from the ZX75 to the video input of the TV, so that I can watch DVDs.

The whole thing can be disconnected in seconds to avoid theft if stored away from home.  All in all, I am happy with the installation.
 TV installation looks fairly clean for this "hacker"

 Installation of the wires.  Top Right clockwise, Audio Out, Video In, Antenna, Power.

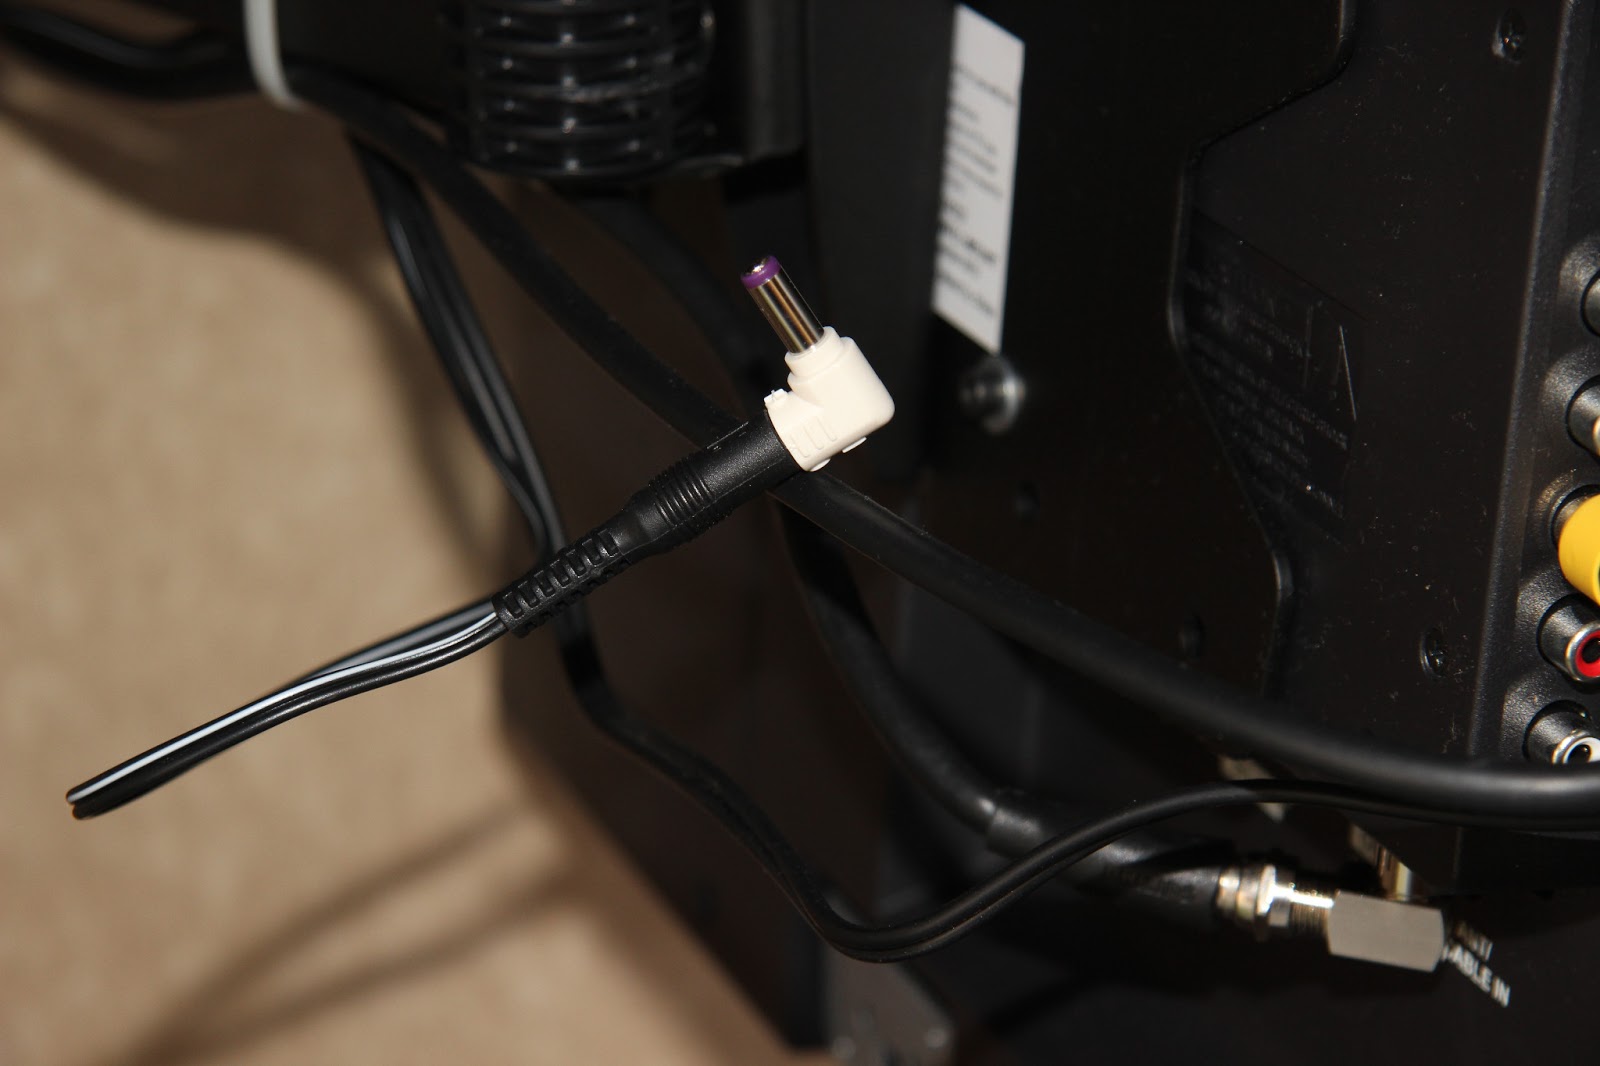
 Power adapter from Radio Shack.  It was easiest to bring the TV in for them to size up the correct plug.

Another view of the back of the Television.

Thursday, April 4, 2013

Trailer Mod - Electric Hot Water Switch

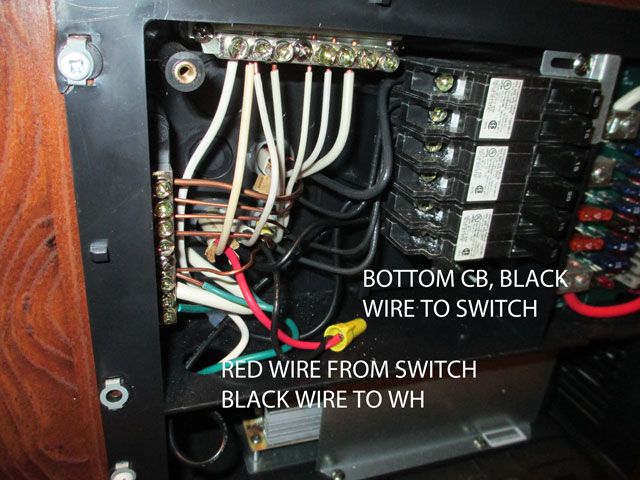
One of my first mods I did to my trailer is install a switch so I can control the electric portion of the hot water heater.  Most of the newer trailers come with a combination propane/electric heater.  Some have both switches located inside the trailer.  Mine, did not.  To turn on or off the electric, you had to either 1) Go outside, open the hot water heater, flip the switch, and head back inside or 2) Open the fuse panel, and flip the circuit breaker for the hot water heater, causing premature wear on the circuit breaker.

So I did some thinking, and after confirming it on Forest River Forums, I wired in a switch with indicator light so that I can switch the electric portion of my hot water on and off when desired.

Here is a few pics of the mod.


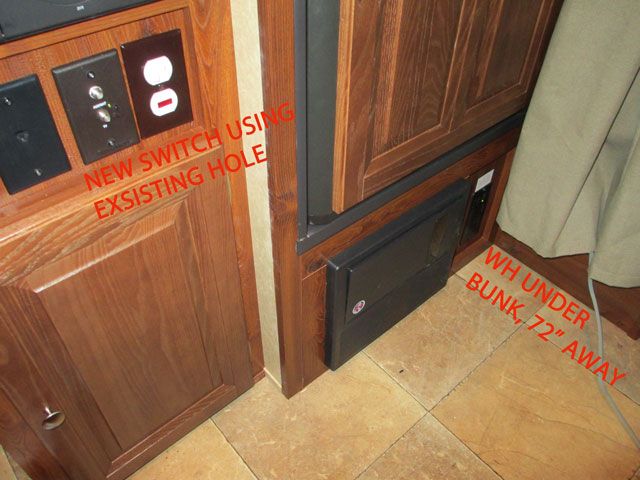
The Reason I put the switch where it is, was due to the fact, the previous owner installed an outlet there.  He also never wired it.  So, I had an outlet there that did nothing.  Not only that, he used the wrong kind of box.  But, I did use the cover for the switch, which only came in white at Home Depot.  I then used the outlet to replace one in my garage.